# ACME.sh
# 介绍
- 一个自动申请域名与自动续签的linux脚本
- 官网 (opens new window)
- 中文说明 (opens new window)
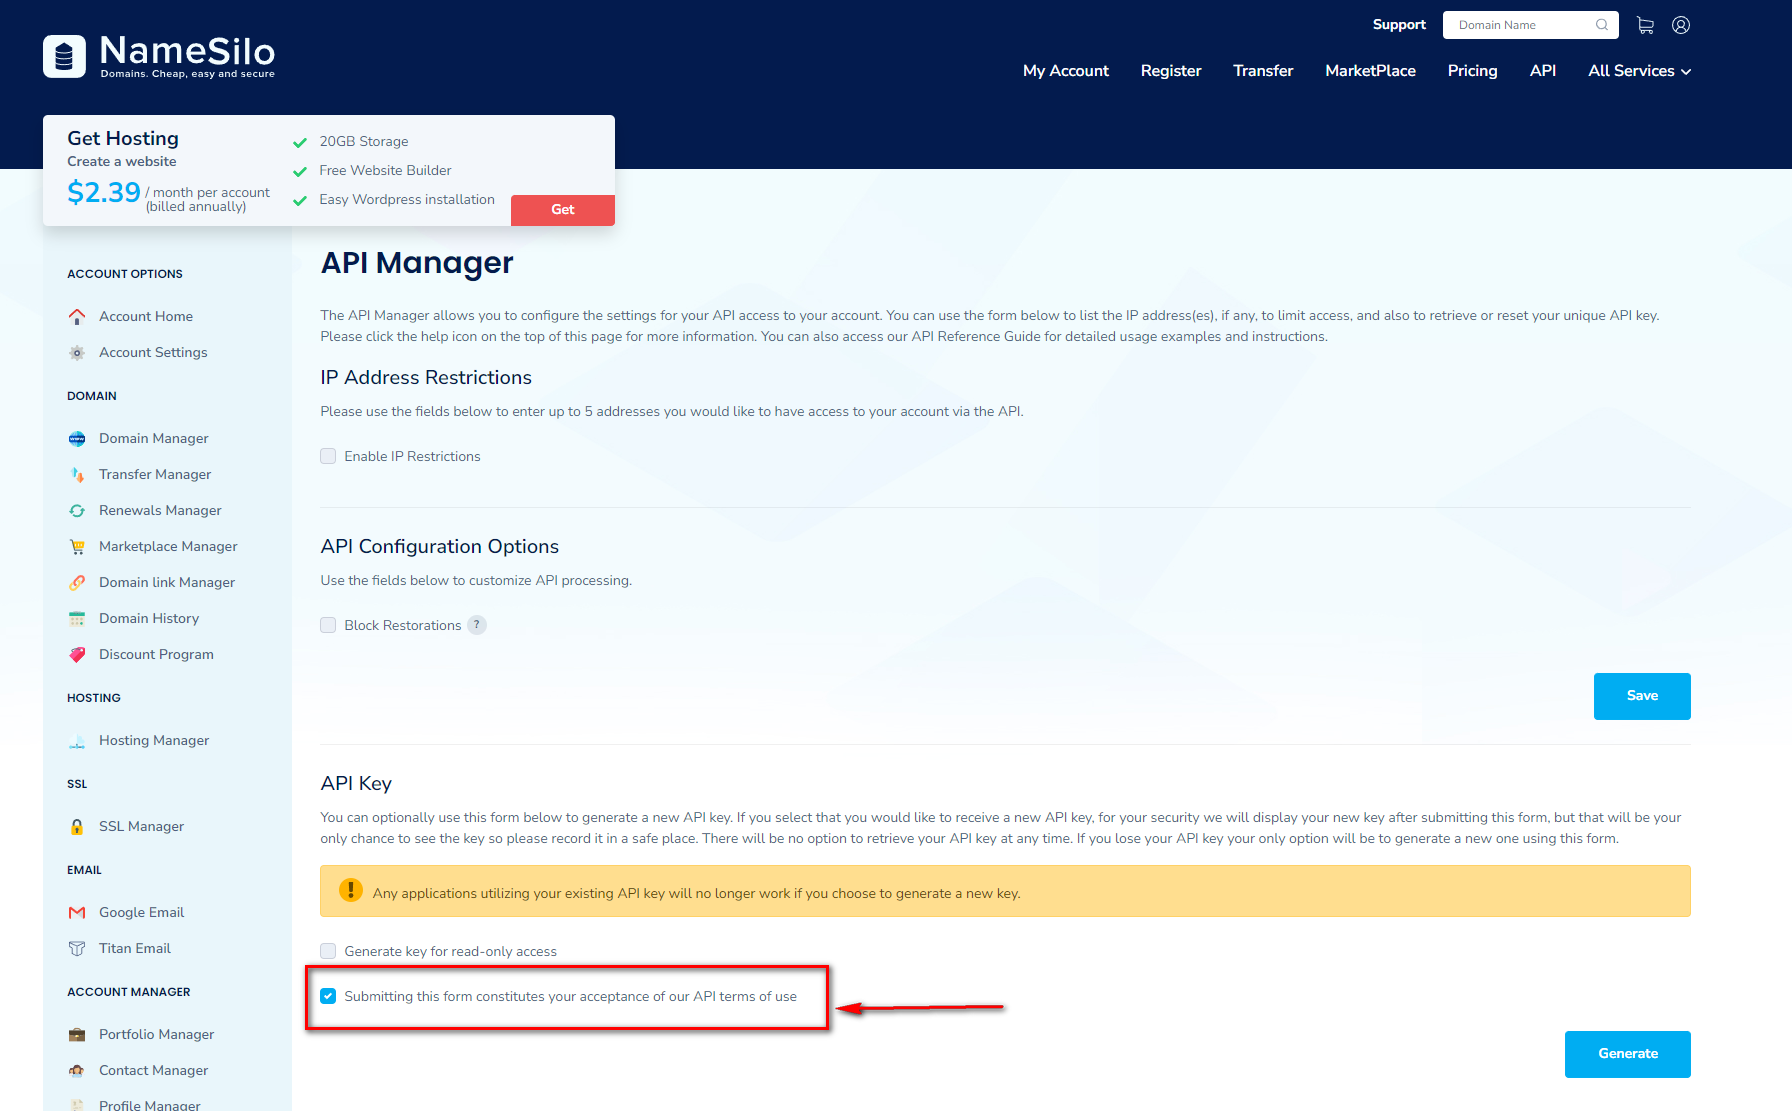
# Namesilo为例申请API密钥
- NameSilo API托管地址 (opens new window)
- 记录下申请的key
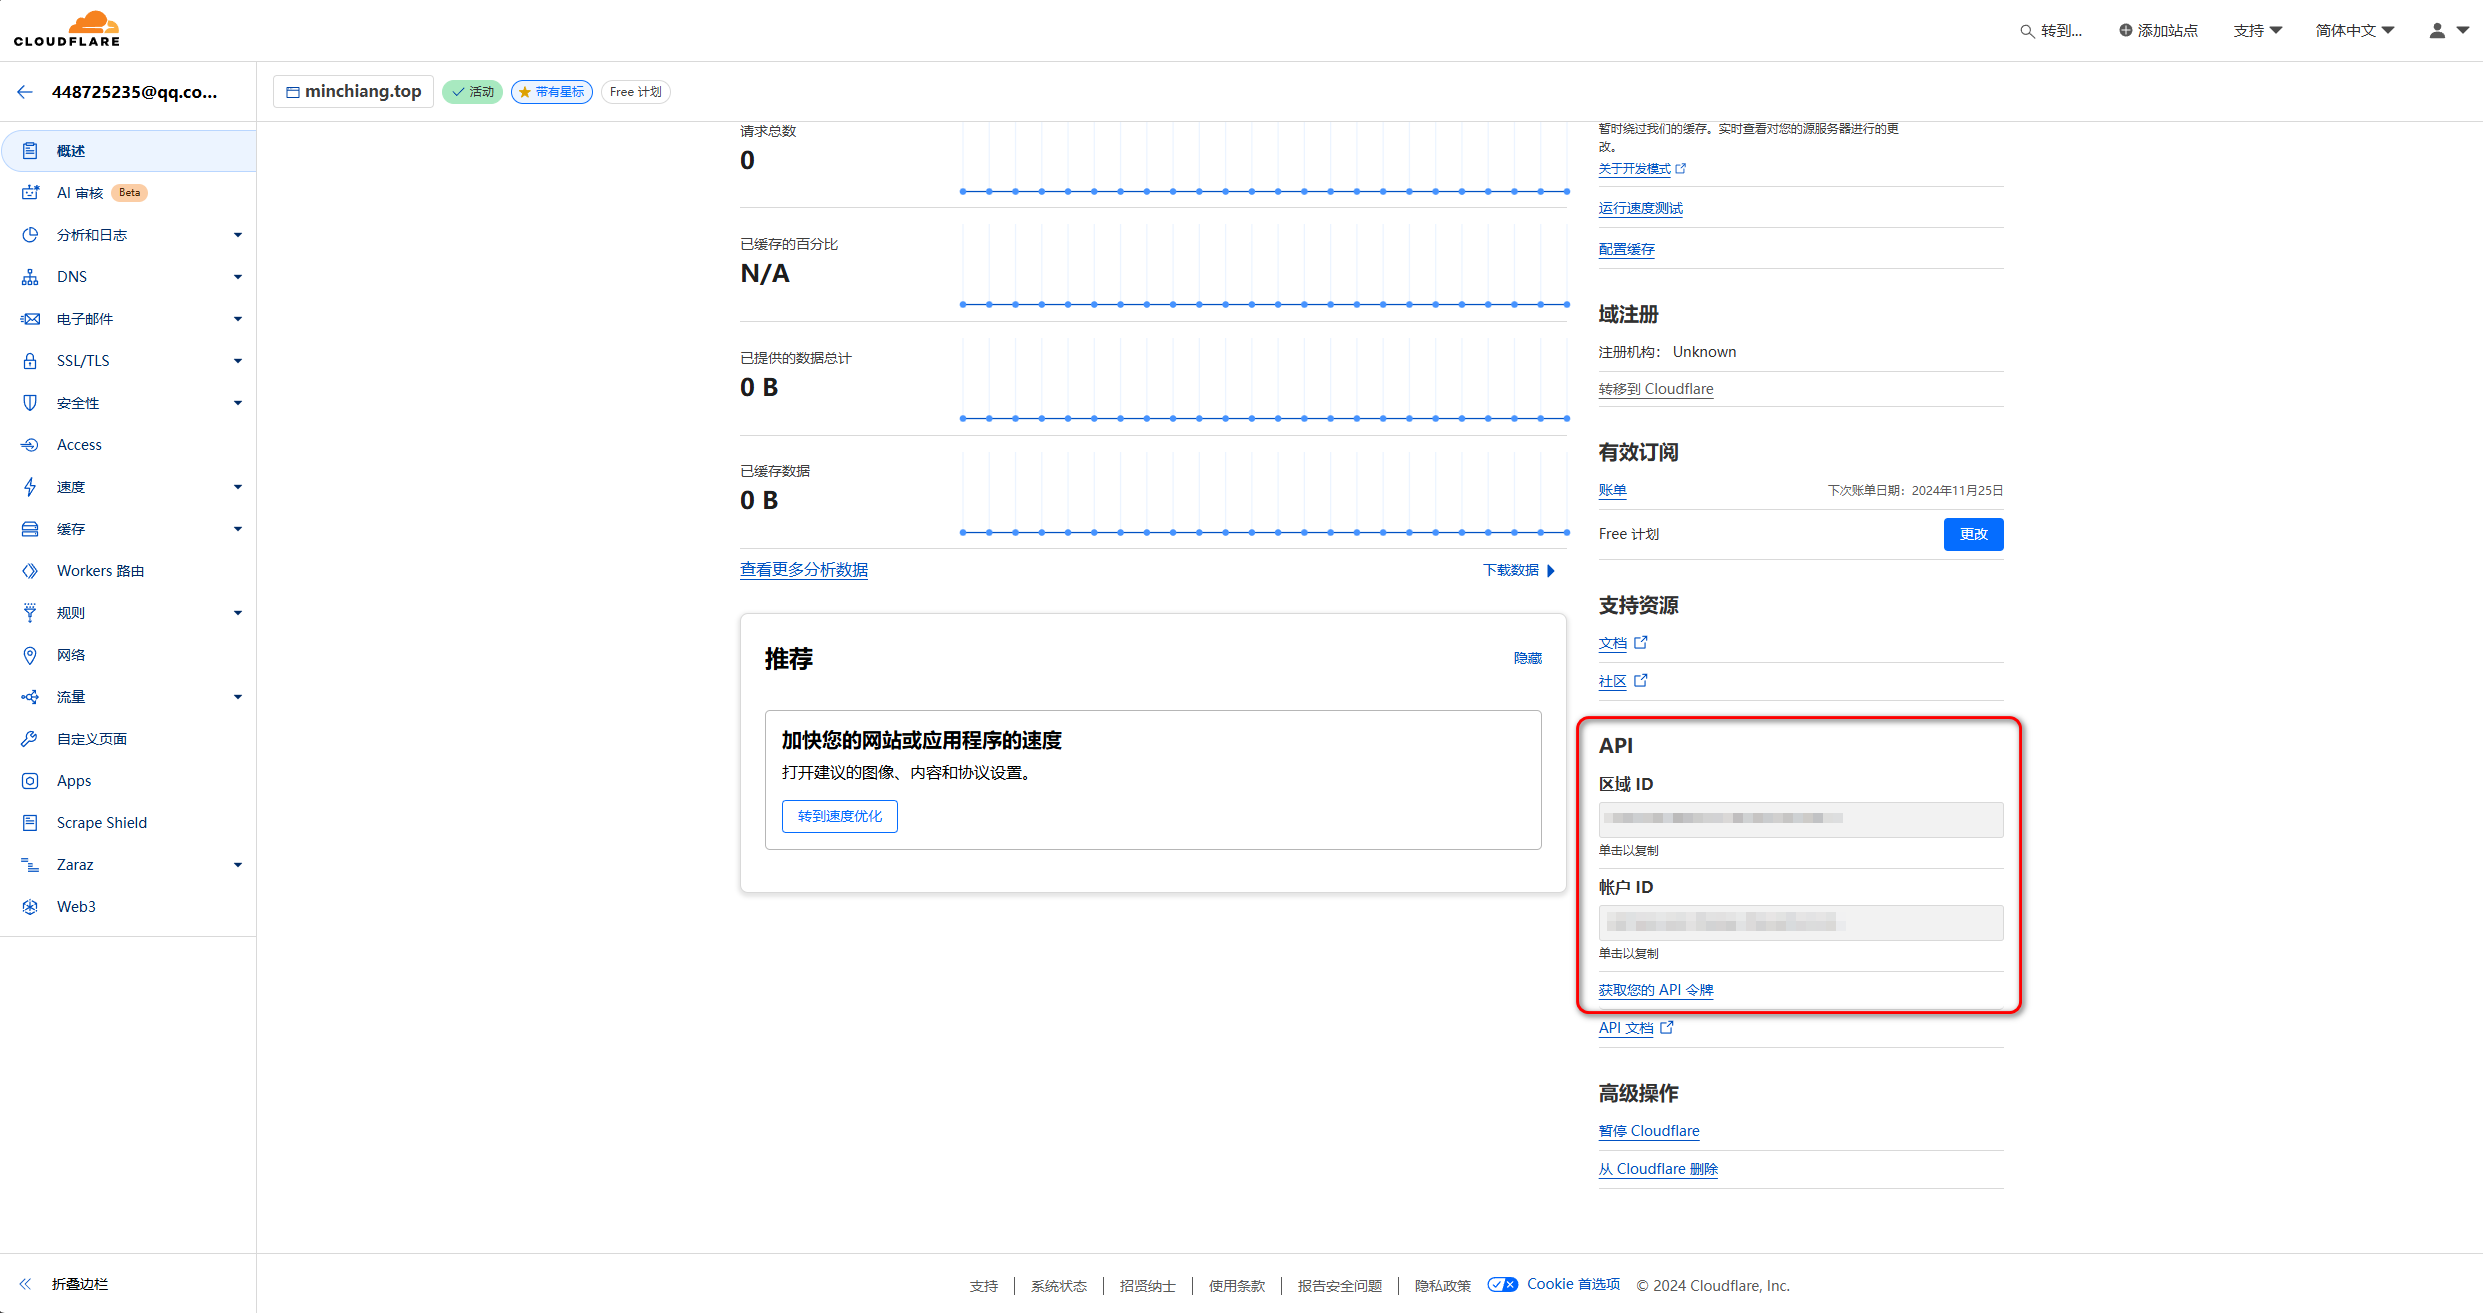
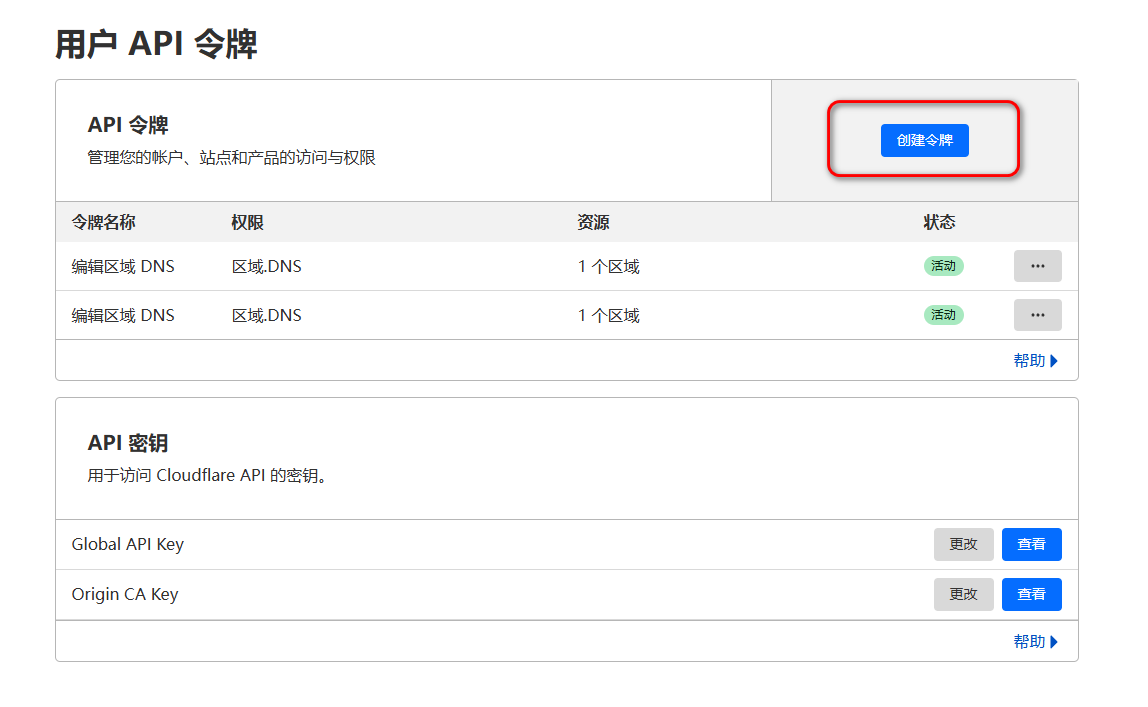
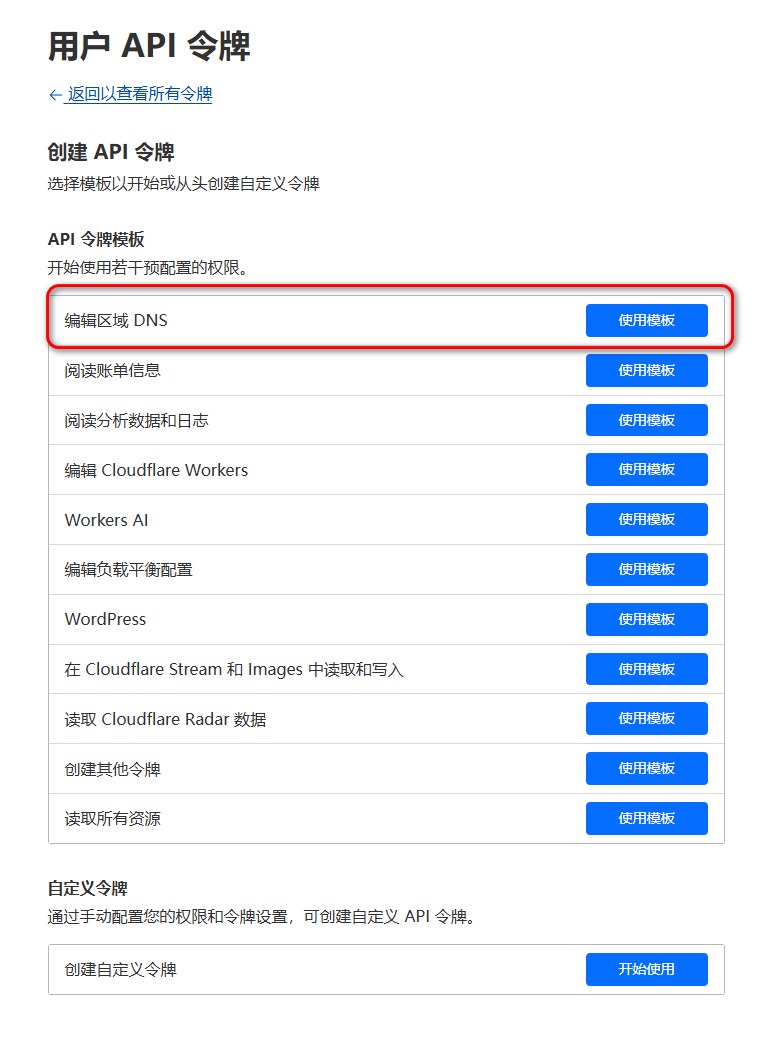
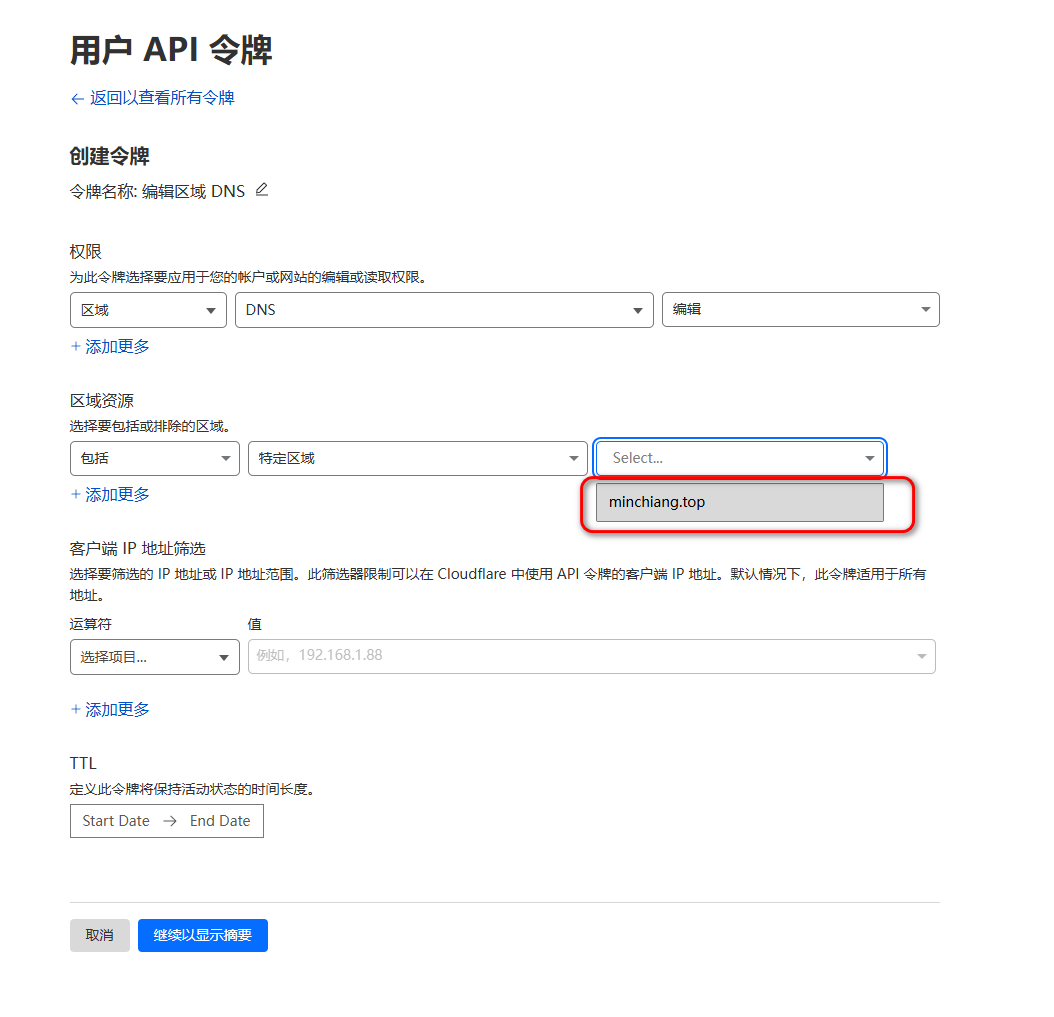
# Cloudflare为例申请Token
记录下下面的摘要内容以备用
export CF_Token="<拷贝的 API Token>"
export CF_Account_ID="<拷贝的 Account ID>"
export CF_Zone_ID="<拷贝的 Zone ID>"
2
3
# 安装
export CF_Token="<拷贝的 API Token>"
export CF_Account_ID="<拷贝的 Account ID>"
export CF_Zone_ID="<拷贝的 Zone ID>"
curl https://get.acme.sh | sh -s email=你的邮箱地址
2
3
4
# 申请证书
注意,ZeroSSL.com CA (opens new window)现在貌似生成不了泛域名的证书,这里用letsencrypt作为默认的CA生成
acme.sh --set-default-ca --server letsencrypt
acme.sh --issue -d minchiang.top -d '*.minchiang.top' --dns dns_cf --log --debug
2
# 安装证书
acme.sh --install-cert -d minchiang.top \
--key-file       /etc/nginx/ssl/minchiang.top/key.pem  \
--fullchain-file /etc/nginx/ssl/minchiang.top/cert.pem \
--reloadcmd     "/etc/init.d/nginx force-reload; x-ui restart"

acme.sh --install-cert -d '*.minchiang.top' \
--key-file       /etc/nginx/ssl/*.minchiang.top/key.pem  \
--fullchain-file /etc/nginx/ssl/*.minchiang.top/cert.pem \
--reloadcmd     "/etc/init.d/nginx force-reload; x-ui restart"
2
3
4
5
6
7
8
9
# 后续维护
安装自动续约脚本任务
acme.sh --install-cronjob1强制续约:
acme.sh --renew -d *.minchiang.top --force1查看证书列表:
acme.sh --list1查看是否已经注册到crontab中
crontab -l1
# Cloudflare
# 使用cloudflare的dns
- 登录官网 (opens new window)
- 点击进入dns
- 记录cloudflare名称服务器
- greg.ns.cloudflare.com
- molly.ns.cloudflare.com
- 点击进入你的域名服务器 (opens new window)
- 点击设置新的名称服务器
- 把其改为上述cloudflare的名称服务器
# Git
# 搭建简易的git服务器
- 安装git:
sudo apt-get install git - 创建git用户:
sudo adduser git - 修改git用户只能用于git:修改
/etc/passwd,把git:x:1000:1000::/home/git:/bin/bash改为git:x:1000:1000::/home/git:/usr/bin/git-shell - 创建仓库的存储目录:
mkdir -p /opt/gitrepo - 初始化仓库:
sudo git init --bare test.git - 修改仓库权限:
sudo chown -R git:git test.git - 生成公钥:
ssh-keygen -t rsa -C 'xxx@xx.xxx' - 添加公钥:打开本地生成的ssh的公钥key,地址一般为
C:\Users\{你的用户}\.ssh\{你的公钥名字}.pub,登录到服务中,在/home/git/.ssh/authorized_keys中添加里面的内容 - 此后可以使用
git clone ssh://git@你的域名:端口号/项目地址路径来下载项目,例如:git clone ssh://git@git.minchiang.top:52400/opt/gitrepo/test.git
# 扩展:使用Https协议支持Git
目标:按照上述git搭建好后,支持ssh协议维护git项目,但是想同时使用https维护git项目,例如git clone https://git.minchiang.top/company.git
安装httpd以及fcgiwrap包
apt install apache2-utils fcgiwrap1创建htpasswd用户配置文件,并且添加用户
touch /etc/nginx/.htpasswd
htpasswd /etc/nginx/.htpasswd <你的用户名>
1
2在/etc/nginx/conf.d/git.conf中添加下面内容
server {
    listen                      443 ssl;
    server_name                 git.minchiang.top;

    ssl_certificate             /etc/nginx/ssl/cert.pem;
    ssl_certificate_key         /etc/nginx/ssl/key.pem;

    ssl_session_cache           shared:SSL:1m;
    ssl_session_timeout         5m;
    ssl_ciphers                 ECDHE-RSA-AES128-GCM-SHA256:ECDHE:ECDH:AES:HIGH:!NULL:!aNULL:!MD5:!ADH:!RC4;
    ssl_protocols               TLSv1.2 TLSv1.3;
    ssl_prefer_server_ciphers   on;

    location ~ (/.*) {
        # 使用 Basic 认证
        auth_basic "请输入git认证";
        # 认证的用户文件
        auth_basic_user_file /etc/nginx/.htpasswd;
        # FastCGI 参数
        fastcgi_pass  unix:/var/run/fcgiwrap.socket;
        fastcgi_param SCRIPT_FILENAME /usr/lib/git-core/git-http-backend;
        fastcgi_param GIT_HTTP_EXPORT_ALL "";
        # git 库在服务器上的跟目录
        fastcgi_param GIT_PROJECT_ROOT    /opt/gitrepo;
        fastcgi_param PATH_INFO           $1;
        # 将认证用户信息传递给 fastcgi 程序
        fastcgi_param REMOTE_USER $remote_user;
        # 包涵默认的 fastcgi 参数;
        include       fastcgi_params;
        # 将允许客户端 post 的最大值调整为 100 兆
        # max_client_body_size 100M;
    }
}

server {
    listen                      80;
    server_name                 git.minchiang.top;
    return 301                  https://$host$request_uri;
}
1
2
3
4
5
6
7
8
9
10
11
12
13
14
15
16
17
18
19
20
21
22
23
24
25
26
27
28
29
30
31
32
33
34
35
36
37
38
39完成后可以通过
git clone https://git.minchiang.top/company.git来拉取仓库,用户名和密码都是刚刚在/etc/nginx/.htpasswd添加的内容如果在拉取项目的时候出现
error: remote unpack failed: unable to create temporary object directory,记得把对应工程在服务器的权限更改为777权限,因为认证用户的文件是在auth_basic_user_file /etc/nginx/.htpasswd,其中不一定有对应的用户存在系统中的
# Git命令行指南
Git快速配置
配置用户名和明码
git config –-global user.name 'xxxxx'
git config –-global user.email 'xxx@xx.xxx'
1
2生成密钥,并上传到你的github的ssh key中 (opens new window)
ssh-keygen -t rsa -C 'xxx@xx.xxx'1改变ssh通道的代理设置,修改配置文件:
C:\Users\你的用户\.ssh\configHost * HostKeyAlgorithms +ssh-rsa PubkeyAcceptedKeyTypes +ssh-rsa Host github.com User git # ssh用户名 Hostname ssh.github.com # 这里是把github.com域名映射为ssh.github.com PreferredAuthentications publickey # 使用公钥私钥认证 IdentityFile ~/.ssh/id_rsa # 私钥位置 Port 443 # 把原生的22端口映射为443端口 ProxyCommand connect -S 127.0.0.1:10808 %h %p # 本地代理,-S表示走socks5协议,如果使用http协议则使用-H, # ProxyCommand connect -H 127.0.0.1:10809 %h %p # 这里使用的是http协议代理,与上面2选11
2
3
4
5
6
7
8
9
10
11
12设置http协议的代理,在命令行中输入
# 使用socks5代理
git config --global http.https://github.com.proxy socks5://127.0.0.1:10808
# 使用http代理
git config --global http.https://github.com.proxy http://127.0.0.1:10809
1
2
3
4设置使用Bcompare作为diff和merge的工具
git config --global diff.tool bc
git config --global mergetool.bc.path '"D:/BCompare/BCompare.exe" "$LOCAL" "$REMOTE"'
git config --global difftool.prompt false

git config --global merge.tool bc
git config --global mergetool.bc.path '"D:/BCompare/BCompare.exe" "$LOCAL" "$REMOTE" "$BASE" "$MERGED"'
git config --global mergetool.prompt false
git config --global mergetool.bc.trustexitcode true
1
2
3
4
5
6
7
8
版本库初始化:git init
加入到暂存区: git add
- 交互模式:-i
- 筛选文件夹或者文件:后面加入目录或者正则表达式
提交修改:git commit -m "注释内容"
查看某个提交记录:git show
查看提交记录历史:git log
- 单行查看:--pretty=oneline
- 以图标方式查看:--graph
- 仅查看某个文件的提交记录:后面添加指定的文件
对比差异:git diff
- 默认情况比较的是工作区和暂存区之间的差异
回滚到某个版本:git reset
- 回滚到上个版本:HEAD^
- 回滚到上上个版本:HEAD^^
- 回滚到某个版本:HEAD~xxx
- 回滚版本库,暂存区和工作区:--hard,会造成内容的丢失
- 回滚版本库和暂存区(默认)**:--mixed,把修改返回到工作区且不暂存
- 回滚版本库:--soft,把修改返回到工作区,并暂存
回滚某个提交:git revert
撤销修改:git restore
- 默认情况仅撤销工作区中的修改
- 撤销暂存区中的修改,并放回到工作区中:--staged
查看分支:git branch
- 新建分支:后面带上新建的分支名称
- 删除分支(已经完成代码合并操作):-d
- 删除分支(未进行代码合并操作): -D
检出分支:git checkout
- 新建并且检出分支:-b
- 有回滚项目文件的功能,把文件快速回滚到之前的状态:-- fileName
合并分支:git merge
- 先在checkout被merge的分支,再执行merge命令,把需要的分支合并到当前分支
摘取单个提交:git check-pick
贮存现场:git stash
- 列出贮存列表:list
- 恢复贮存现场(不删除贮存内容):apply
- 恢复贮存现场(删除贮存内容):pop
- 删除贮存现场:drop
打标签:git tag
- 默认为查看所有标签
- 指定标签信息:-m
- 删除标签:-d
Git和SVN的区别
- Git是分布式的:每个开发人员都是中心版本库的一个克隆
- Git按内容元数据方式存储,而SVN是按文件存储:.svn和.git比较差异非常大,.git目录下有中心版本库的所有东西,例如标签、分支和版本记录等;
- Git的分支和SVN的分支不同:Git分支是同一个文件夹的不同表现方式,而SVN是在不同的文件夹下;
- Git没有一个全局的版本号,而SVN有;
- Git的内容完整性要优于SVN:Git的内容存储使用SHA-1哈希算法,确保内容的完整性。
# IDEA快速工具
# 快捷键
- 查看调用关系:Ctrl + Alt + h
- 格式化代码:Ctrl + Alt + l
- 优化导入的包:Ctrl + Alt + o
- 快速重命名:Shift + F6
- 删除当前行:Ctrl + y
- 跳入父类:Ctrl + u
- 查看实现类:Ctrl + Alt + b
- 前进后退:Ctrl + Alt + 左右
# 破解工具
- 去https://3.jetbra.in/ (opens new window)中下载最新的jetbra.zip
- 打开idea64.exe.vmoptions,在最后添加:-javaagent:C:\xxx\jetbra\ja-netfilter.jar=jetbrains
- 点击页面中的工具的密码(当然是过期共用的啦,不配合jetbra.zip是无法使用的)
- 黏贴到激活Activation code栏目中,即可完成破解
# 代码模板
settings -> Editor -> Color Schema -> File and Code Templates
Enum模板
#if (${PACKAGE_NAME} && ${PACKAGE_NAME} != "")package ${PACKAGE_NAME};#end

import java.util.Arrays;
import java.util.Collections;
import java.util.Map;
import java.util.function.Function;
import java.util.stream.Collectors;

#parse("File Header.java")
public enum ${NAME} {
    /**
    * 未知
    */
    UNKNOWN(0),

    ;

    private static final Map<Integer, ${NAME}> ALL = Collections.unmodifiableMap(Arrays.stream(${NAME}.class.getEnumConstants()).collect(Collectors.toMap(value -> value.id, Function.identity())));

    /**
    * 转换
    *
    * @param id id
    * @return 对应类别
    */
    public static ${NAME} from(int id) {
        return ALL.get(id);
    }

    /**
    * 唯一标志
    */
    public final int id;

    ${NAME}(int id) {
        this.id = id;
    }
}
1
2
3
4
5
6
7
8
9
10
11
12
13
14
15
16
17
18
19
20
21
22
23
24
25
26
27
28
29
30
31
32
33
34
35
36
37
38Factory模板
#if (${PACKAGE_NAME} && ${PACKAGE_NAME} != "")package ${PACKAGE_NAME};#end

#parse("File Header.java")
public class ${NAME}Factory {

    public ${NAME}Factory() {
    }

    /**
    * 创建牌组合
    *
    * @return 工厂创建对象
    */
    public ${NAME} create() {
        return null;
    }

}
1
2
3
4
5
6
7
8
9
10
11
12
13
14
15
16
17
18Singleton模板
#if (${PACKAGE_NAME} && ${PACKAGE_NAME} != "")package ${PACKAGE_NAME};#end
#parse("File Header.java")
public class ${NAME} {
    private ${NAME}() {
    }

    /**
    * 获取单例对象
    *
    * @return 实例对象
    */
    public static ${NAME} getInstance() {
    return ${NAME}Holder.INSTANCE;
    }

    private static final class ${NAME}Holder {

    private static final ${NAME} INSTANCE = new ${NAME}();

    }
}
1
2
3
4
5
6
7
8
9
10
11
12
13
14
15
16
17
18
19
20
21标准头
/**
* @author MinChiang
 * @version 1.0.0
 * @date ${YEAR}-${MONTH}-${DAY} ${TIME}
*/
1
2
3
4
5
# 插件
- Alibaba Java Coding Guidelines(阿里规范)
- GenerateSerialVersionUID(生成UUID)
- Grep Console(支持控制台打印颜色)
- GsonFormatPlus(json -> 实体对象)
- MapStruct Support(MapStruct的支持)
- Maven Helper(对Maven依赖的问题的解决)
- MyBatisX(快速生成MyBatis plus的工具)
- One Dark theme(黑暗配色)
- Rainbow Brackets(彩色的括号)
- RestfulToolkit(快速查找Controller)
- String Manipulation(各种命名风格的格式切换)
- Translation(翻译)
- Protocol Buffer Editor(PB文件支持)
- SequenceDiagram(快速生成时序图)
# Xshell
配色方案,保存下面文本为Solarized Dark.xcs
打开xshell -> 工具 -> 配色方案 -> 导入
[Solarized Dark]
text=00ff40
cyan(bold)=93a1a1
text(bold)=839496
magenta=dd3682
green=859900
green(bold)=586e75
background=042028
cyan=2aa198
red(bold)=cb4b16
yellow=b58900
magenta(bold)=6c71c4
yellow(bold)=657b83
red=dc322f
white=eee8d5
blue(bold)=839496
white(bold)=fdf6e3
black=002b36
blue=268bd2
black(bold)=073642
[Names]
name0=Solarized Dark
count=1
2
3
4
5
6
7
8
9
10
11
12
13
14
15
16
17
18
19
20
21
22
23
# Maven发布流程
详见可见文档:Publishing By Using the Maven Plugin (opens new window)
需要一个已经认证通过的Namespace,如果您是通过github的方式登录的,会自动有一个通过认证的namespace,名字为io.github.您的名称;如果未通过认证,请查阅Register a Namespace (opens new window)文档进行Namespece认证
在Account page (opens new window)中点击Generate User Token,获得下面内容
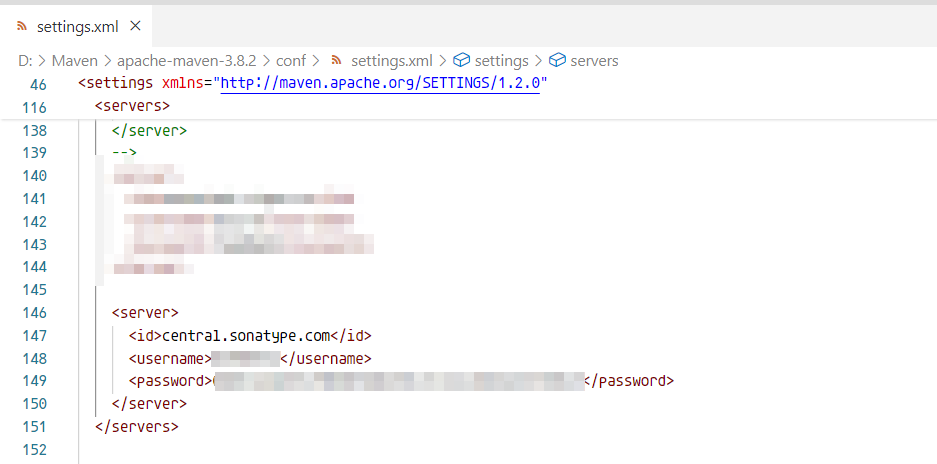
<settings>
  <servers>
    <server>
      <id>${server}</id>
      <username><!-- your token username --></username>
      <password><!-- your token password --></password>
    </server>
  </servers>
</settings>
1
2
3
4
5
6
7
8
9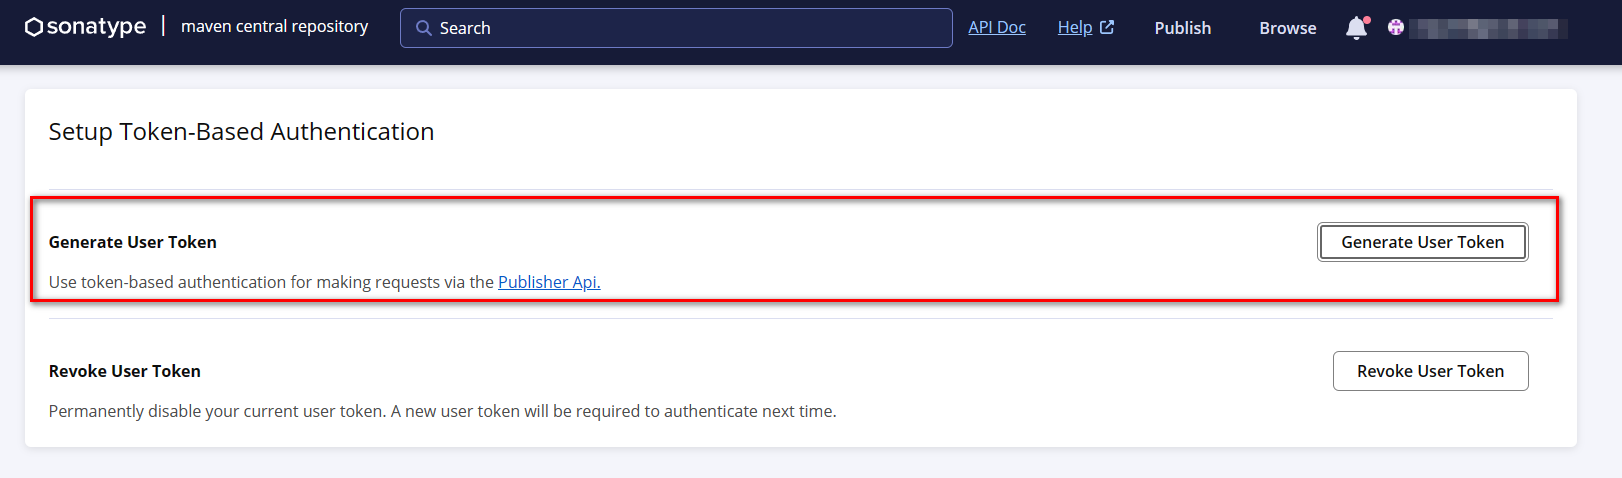
在maven的setting.xml中的配置文件中添加上面生成的内容,上面的server可以随意命名,这里定义为:central.sonatype.com
对应的
pom.xml文件如下,请注意正确填写publishingServerId:<?xml version="1.0" encoding="UTF-8"?> <project xmlns="http://maven.apache.org/POM/4.0.0" xmlns:xsi="http://www.w3.org/2001/XMLSchema-instance" xsi:schemaLocation="http://maven.apache.org/POM/4.0.0 http://maven.apache.org/xsd/maven-4.0.0.xsd"> <modelVersion>4.0.0</modelVersion> <groupId>xxxx</groupId> <artifactId>xxxx</artifactId> <version>1.0.1</version> <packaging>jar</packaging> <name>xxxx</name> <url>xxxx</url> <description> ctapi-sdk-acct </description> <scm> <connection>scm:git:你的git仓库</connection> <developerConnection>scm:git:你的git仓库</developerConnection> <url>项目链接</url> </scm> <developers> <developer> <id>开发者id,随便填</id> <name>开发者名称,随便填</name> <roles> <role>Project Manager</role> </roles> <email>开发者的email</email> <url>开发者的url</url> </developer> </developers> <licenses> <license> <name>The Apache Software License, Version 2.0</name> <url>http://www.apache.org/licenses/LICENSE-2.0.txt</url> </license> </licenses> <distributionManagement> <snapshotRepository> <id>sonatype-snapshots</id> <url>https://oss.sonatype.org/content/repositories/snapshots</url> </snapshotRepository> <repository> <id>sonatype-staging</id> <url>https://oss.sonatype.org/service/local/staging/deploy/maven2</url> </repository> </distributionManagement> <properties> <maven.compiler.source>8</maven.compiler.source> <maven.compiler.target>8</maven.compiler.target> <project.build.sourceEncoding>UTF-8</project.build.sourceEncoding> </properties> <dependencies> 省略对应的依赖项 </dependencies> <build> <plugins> <plugin> <groupId>org.apache.maven.plugins</groupId> <artifactId>maven-compiler-plugin</artifactId> <version>3.13.0</version> <configuration> <source>${maven.compiler.source}</source> <target>${maven.compiler.target}</target> <encoding>${project.build.sourceEncoding}</encoding> </configuration> </plugin> <plugin> <groupId>org.apache.maven.plugins</groupId> <artifactId>maven-source-plugin</artifactId> <version>3.3.1</version> <executions> <execution> <id>attach-sources</id> <goals> <goal>jar-no-fork</goal> </goals> </execution> </executions> </plugin> <plugin> <groupId>org.sonatype.central</groupId> <artifactId>central-publishing-maven-plugin</artifactId> <version>0.4.0</version> <extensions>true</extensions> <configuration> <publishingServerId>对应的server,按照上面的例子这里应该写central.sonatype.com</publishingServerId> <tokenAuth>true</tokenAuth> </configuration> </plugin> <plugin> <groupId>org.apache.maven.plugins</groupId> <artifactId>maven-javadoc-plugin</artifactId> <version>3.6.3</version> <executions> <execution> <id>attach-javadocs</id> <goals> <goal>jar</goal> </goals> </execution> </executions> <!-- 如果不想检查则把这里的configuration加上 --> <configuration> <doclint>none</doclint> </configuration> </plugin> <plugin> <groupId>org.apache.maven.plugins</groupId> <artifactId>maven-gpg-plugin</artifactId> <version>3.2.4</version> <executions> <execution> <id>sign-artifacts</id> <phase>verify</phase> <goals> <goal>sign</goal> </goals> </execution> </executions> </plugin> </plugins> </build> </project>1
2
3
4
5
6
7
8
9
10
11
12
13
14
15
16
17
18
19
20
21
22
23
24
25
26
27
28
29
30
31
32
33
34
35
36
37
38
39
40
41
42
43
44
45
46
47
48
49
50
51
52
53
54
55
56
57
58
59
60
61
62
63
64
65
66
67
68
69
70
71
72
73
74
75
76
77
78
79
80
81
82
83
84
85
86
87
88
89
90
91
92
93
94
95
96
97
98
99
100
101
102
103
104
105
106
107
108
109
110
111
112
113
114
115
116
117
118
119
120
121
122
123
124
125
126
127
128
129
130
131
132
133
134
135
136密钥对准备部分,到GnuPG (opens new window)中下载Gpg4win (opens new window),并安装,按照流程生成密钥对,注意安装完后重启机器;在终端中执行
gpg --version观察是否有内容输出,可以详见文档GPG Signed Components (opens new window)部分在maven中分别执行clean、package、deploy
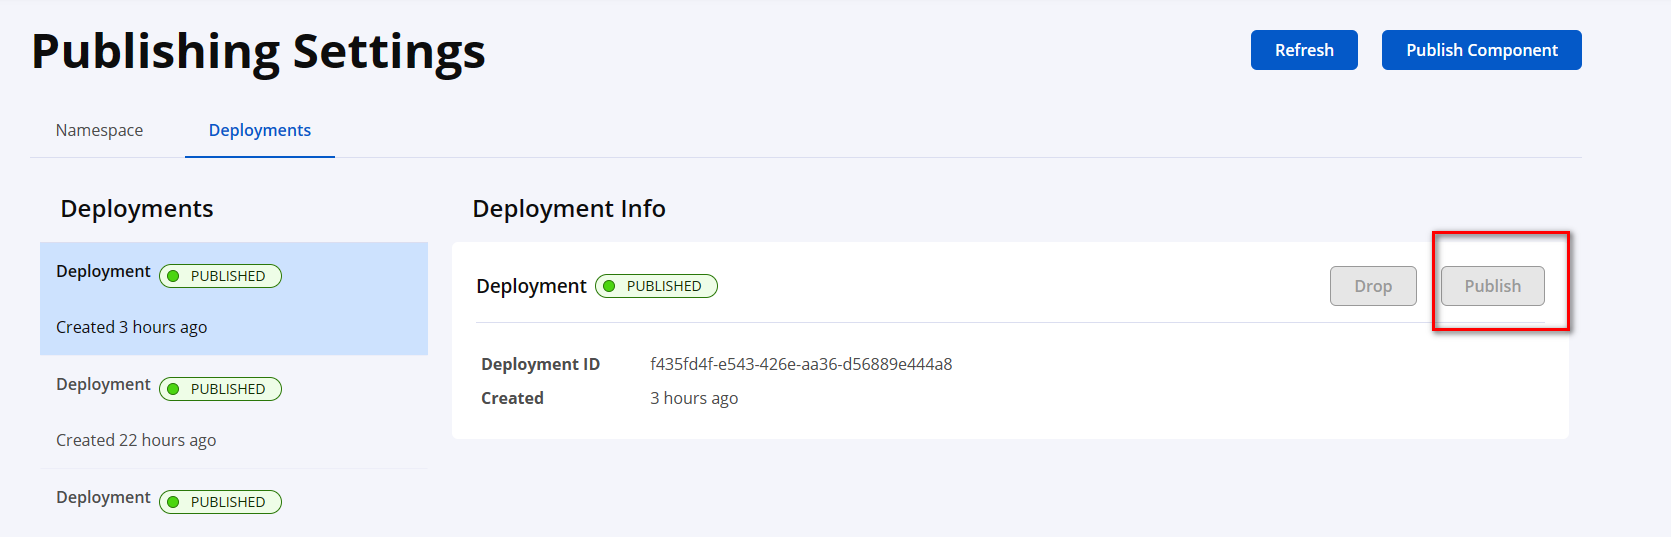
到Publishing Settings (opens new window)页面中点击发布按钮,等待完成发布动作